Edit Black config in VS Code
Till now users had to edit config in their favourite editor Nano or VIM using SSH session.
Now it is possibly to edit config and don’t use terminal at all. You can use VSCode in your HA.
Preparation
Install VS Code addon for Home Assistant (or open VS Code on your PC)
In Marketplace install SSH FS addon by Kelvin.
Create SSH key for yourself. For PC version you can follow guide: https://docs.github.com/en/authentication/connecting-to-github-with-ssh/generating-a-new-ssh-key-and-adding-it-to-the-ssh-agent?platform=windows
For Home Assistant addon follow guide below.
If you are using SSL you don’t need to follow point below.
Prepare for unsecure HTTP access
If you’re using Home Assistant without SSL it’s worth to switch to SSL.
To use VSCode you’d need do the following in Chrome.
Go to chrome://flags.
Find flag Insecure origins treated as secure and Enable it. In window type address you’re using to access your Home Assistant eg. http://192.168.1.2:8123. Click Relaunch.
Create SSH Key for VS Code addon
Click CTRL-~ to open vscode built-in terminal
Paste command
ssh-keygen -t ed25519 -C "boneio1" -f /root/config/id_ed25519
Type Enter when you asked for password for empty password or put some password. You should see:
Generating public/private ed25519 key pair.
Enter passphrase (empty for no passphrase):
Enter same passphrase again:
Your identification has been saved in /root/config/id_ed25519
Your public key has been saved in /root/config/id_ed25519.pub
The key fingerprint is:
SHA256:m38+8gqQi6hZjYAEGSjsnvriafnOqca9w7vmHUORpNI boneio1
The key's randomart image is:
+--[ED25519 256]--+
|=o   .           |
|=.. o .          |
|oo E o           |
|o..   ..         |
|+ .  .o S        |
| + +.. o o       |
|o B oo. +        |
|oOo=o o  o. o    |
|**BX=.    o*o.   |
+----[SHA256]-----+
Now copy ssh key into your beaglebone. Change beaglebone to your hostname or IP address.
ssh-copy-id -i /root/config/id_ed25519.pub debian@beaglebone
Type your password and this part is ready!
Configure SSH FS
In left pane choose SSH FS.
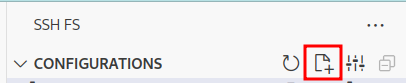
Write some meaningful name for you eg boneio black 1.
Now you need to fill:
- Host eg beaglebone or IP Address
- Root - root directory of your boneio black config eg
/home/debian/boneio - Username - typically debian
- Private key - use file we created before.
/root/config/id_ed25519
Go to the bottom of the page and click Save.
That’s it. Now you can edit yours boneIO Black config files in Home Assistant.
If you want to reload or restart boneio black app then you can go to Devices and integration -> MQTT -> Your boneio -> Configuration and choose to Restart boneIO or Reload actions of inputs.